CoreData and Swift by YongSir🇨🇳🇨🇳
这是这本书Core Data by Tutorials的读书笔记,大大的封面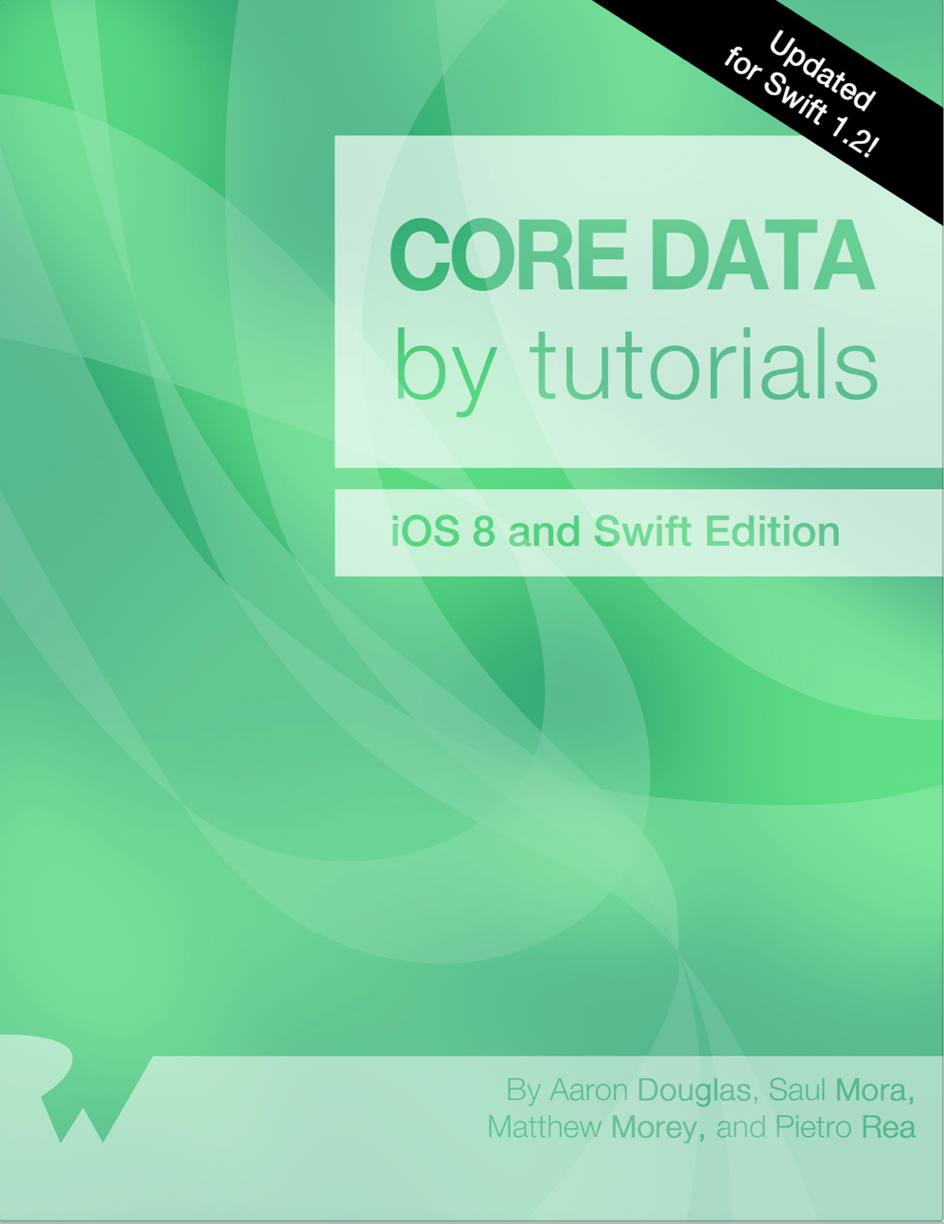
section one
First,why we need coreData?It matters data persistence.
是啊,市场上有SQL和Realm这些简单易用的东西,谁还需要coreData
但是coreData比你想象的强大得多,最大的优势在于是苹果的亲儿子,全平台通用;而那些动则用其效率和操作的,我就补充一段Marcus Zarra大神的回答:
First, my opinion on third-party code is well known: all code sucks. I think Realm is trying to solve a problem that is the incorrect problem to solve. They’re trying to be faster than Core Data, whereas Core Data is trying to be fast enough, but maintainable. In my playing and working with Realm, I find that the amount of code you write is about equal. … As a project leader or a developer, I want maintainability and consistency. My big concern with third-party frameworks is that they go away. It happens over and over again. We don’t know how long Realm’s going to be here. I don’t understand their business model. Core Data for me is good enough; it’s mature, it’s been around long enough, and it’s fast enough. If it’s not fast enough, I’m probably doing something wrong because I’m in object space anyway. There’s a lot of unknowns about Realm.
CoreData的意义在于数据的更灵活更高效的存储和处理,能够将数据固化时最起码的需求。干巴巴的学习没有任何意思,我们就从这个基本的需求入手,一个联系人的Demo,利用coreData实现信息从内存到本地的固化,并从本地读取。引述书中的要求:
When you tap the Home button, the app that’s currently in the foreground goes to the background. When this happens, the operating system flash-freezes everything currently in memory, including the strings in the names array. Similarly, when it’s time to wake up and return to the foreground, the operating system restores what used to be in memory as if you’d never left.
what we really want?
to persist the names you enter so they’re available for viewing after a fresh app launch.
- The first step is to create a managed object model
Since you elected to use Core Data when you created the HitList project, Xcode automatically created a data model file for you and named it HitList.xcdatamodeld.
An entity is a class definition in Core Data. The classic example is an Employee or a Company. In a relational database, an entity corresponds to a table.
An attribute is a piece of information attached to a particular entity. For example, an Employee entity could have attributes for the employee’s name, position and salary. In a database, an attribute corresponds to a particular field in a table.
A relationship is a link between multiple entities. In Core Data, relationships between two entities are called to-one relationships, while those between one and many entities are called to-many relationships. For example, a Manager can have a to-many relationship with a set of employees, whereas an individual Employee will have a to-one relationship with his manager.
As you’ve probably noticed, entities sound a lot like a classes. Likewise, attributes/relationships sound a lot like properties. What’s the difference? You can think of a Core Data entity as a class “definition” and the managed object as an instance of that class.
首先,需要创建托管对象模型NSManagedObjectModel,就是指定义在.mom中的所有实体,操作中将我们的数据模型添加到它之中
基本的概念:
entity实体 : 理解为数据库中的表,也就是一种类,如一个Class Employee或者Class Company
attribute属性 : 理解为数据库表中的字段,也就是特定实体的具体信息,如一个Employee实体包含name,position,salary等属性
relationship关系: 就是不同实体的关系,在coreData中,两个实体间叫有一对一关系,如果一个实体和多个实体之间,就称之为多对一关系。比如一个manager和employee之间就是对多关系,而一个employee 和manager就是对一的关系。
- Next, replace the table view’s model
1 | // var names = [String]() |
NSManagedObject represents a single object stored in Core Data—you must use it to create, edit, save and delete from your Core Data persistent store. As you’ll see shortly, NSManagedObject is a shape-shifter. It can take the form of any entity in your data model, appropriating whatever attributes and relationships you defined.
- Before you can save or retrieve anything from your Core Data store, you first need to get your hands on an NSManagedObjectContext. You can think of a managed object context as an in-memory “scratchpad” for working with managed objects.
- You create a new managed object and insert it into the managed object context. You can do this in one step with NSManagedObject’s designated initializer: init(entity:insertIntoManagedObjectContext:).
- With an NSManagedObject in hand, you set the name attribute using key-value coding. You have to spell the KVC key (“name” in this case) exactly as it appears on your data model, otherwise your app will crash at runtime.
- You commit your changes to person and save to disk by calling save on the managed object context. Note that save takes one parameter, which is a pointer to an NSError; if there is ever an error with the save operation, you can inspect the error and alert the user if necessary.
- Congratulations! Your new managed object is now safely ensconced in your Core Data persistent store. Insert the new managed object into the people array so that it shows up in the table view when it reloads.
其次,使用托管对象 [NSManagedObject] 集合来替换tableView数据模型(这里的names)
托管对象NSManagedObject,就是我们拿来操作数据的基本单位。对应下来:
- 增加一条数据是在NSManagedObjectContext新建一个NSManagedObject。
- 查找数据是查找NSManagedObject。
- 修改是修改NSManagedObject类的属性。
- 删除是从NSManagedObjectContext里面删除NSManagedObject类。
最后我们保存NSManagedObjectContext,然后一直向上传递到磁盘上面去,才是持久化的修改。总之,模型对象的数据被持有在NSManagedObject对象中。每一个NSManagedObject对象都对应一个实体(就像每一个对象都有一个类)。
而对于NSManagedObject的操作又引出一个叫NSManagedObjectContext的东东,这是是我们经常使用到的一个类。对于为什么要有这个类,因为数据库的IO操作是很费时的,因此把一系列的操作缓存到了一个内存区域,等待合适的实际在去写入真实的磁盘中。这样大大的提高效率。比如插入一条数据,然后修改数据,最后删除掉这条数据,如果是每次都执行commit的话是操作三次IO,如果我们把这三条合并在一起commit的话就只有一次commit。这样能有效的提高整个系统的效率。NSManagedObjectContext就是为提供IO效率而在内存中的“暂存”。同时提前指出使用Core Data需要注意的是:NSManagedObjectContext并不是线程安全的,更多相关讨论先往后放。
- Fetching from CoreData
LoadData from coreData
- before you can do anything with Core Data, you need a managed object context. Fetching is no different!
- Setting a fetch request’s entity property, or alternatively initializing it with init(entityName:), fetches all objects of a particular entity. This is what you do here to fetch all Person entities.
NSFetchRequest is the class responsible for fetching from Core Data.
Fetch requests have several qualifiers that refine the set of results they return. - You hand the fetch request over to the managed object context to do the heavy lifting. executeFetchRequest(_:error:) returns an optional array of managed objects that meets the criteria specified by the fetch request.
获取已保存的数据:
- 先要得到上下文
- 设置fetchRequest
- 根据请求从上下文获取数据并做数据处理

section two
就创建一个小小的BowTie管理的demo,就是管理你的不同颜色的领结,UI和功能如下:
segumentController - 可选颜色
name - 名称
rante - 评分,从0-5
times - 佩戴次数
lastWorn - 上次佩戴的日期
Favorite - 是否最爱
wear - 增加佩戴次数和更新佩戴日期
rate - 评分允许你重新评分
OK,What you have to do now is take this sample data, store it in Core Data and use it to implement the bow tie management functionality.
Firstly ,create your data model
在BowTies.xcdatamodeld中操作,添加Bowtie实体,同时配置属性,为属性选取对应的数据类型,便利的可视化操作问什么不呢……^^
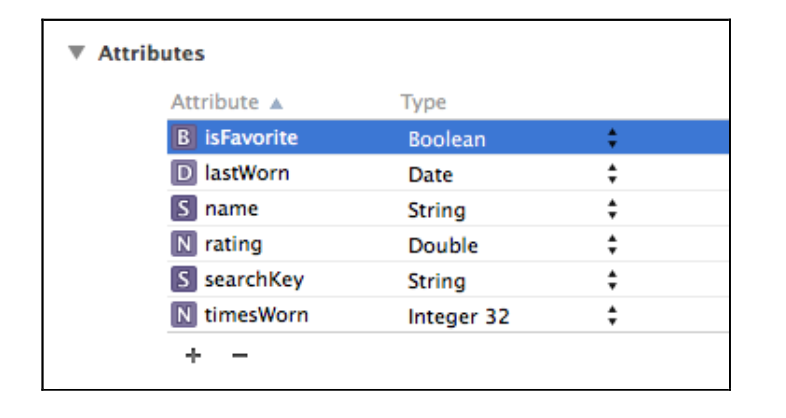
Core Data also provides the option of storing arbitrary blobs of binary data directly in your data model. These could be anything from images to PDF files, or anything else that can be serialized into zeroes and ones.
如果注意到每个领结都是有对应image 的,事实上coreData也支持定义二进制数据,所以可以添加一个photoData属性,类型选为BinaryData,但是这样便利的结果就是会带来急剧的消耗,根据SQLite中的使用,即便只想要一个name,内存中也会全部加载database中的内容,这样的消耗是不可接受的。
Luckily, Core Data anticipates this problem.我们只需要对photoData属性进行配置Allows External Storage,如图: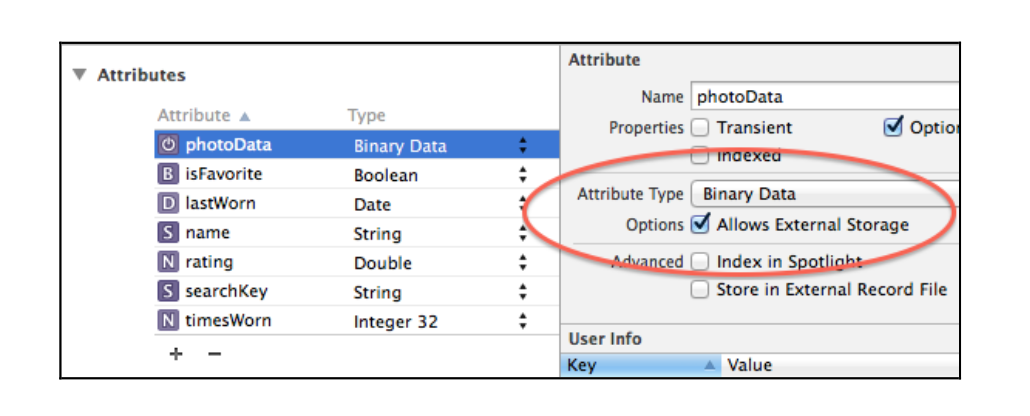
The Allows External Storage option is only available for the binary data attribute type.
When you enable Allows External Storage, Core Data heuristically decides on a per-value basis if it should save the data directly in the database or store a URI that points to a separate file.当选取允许外部存储时,CoreData直接预判是否应该保存数据到database亦或是转而储存一个指向特定文件的URL。
所以,目前说来 coreData 支持常见的所有基本的数据类型:In sum, besides strings, integers, doubles, Booleans and dates, Core Data can also save binary data, and it can do so efficiently and intelligently.
但仅仅是这样还不够,因为更多时候我们需要能够存储自定义的类型,一般就是自定的对象,比如Demo中每个领结都有颜色,而基本类型中是没有UIColor的,Once again, Core Data has your back,在Attributes的Type中有个Transformable类型,CoreData允许所有遵循NSCoding协议的对象都可以存储。正如UIColor (UIColor conforms to NSSecureCoding, which inherits from NSCoding, so it can use the transformable type out of the box),添加tintColor:
New, data model is now complete. The Bowtie entity has the eight attributes it needs to store all the information in SampleData.plist.
secondly, managed object subclasses
在section1中的demo中,托管对象使用的是KVC给Person实体的name属性赋值,like this:
1 | // 使用KVC向属性(attribute)赋值 |
你可以使用KVC但并不意味着应该用它,因为KVC的缺点也很明显,就是它的一切都依赖于字符串,The biggest problem with key-value coding is the fact that you’re accessing of data using strings instead of strongly-typed classes. This is often jokingly referred to as writing stringly typed code.
As you probably know from experience, “stringly typed” code is vulnerable to silly human errors such as mistyping and misspelling. Key-value coding also doesn’t take full advantage of Swift’s type-checking and Xcode’s auto-completion. :]
最好的替代方式就是在数据模型中为每个实体创建NSManagedObject子类,这就意味会存在一个着包含所有对应属性的Bowtie类,使用Xcode来生成吧
Make sure you still have Bow_Ties.xcdatamodeld open, and go to Editor\Create NSManagedObject Subclass…. Select the data model and then the Bowtie entity in the next two dialog boxes, then select Swift as the language option in the final box. If you’re asked, say No to creating an Objective-C bridging header. Click Create to save the file.
Bowtie看起来就是这样:1
2
3
4
5
6
7
8
9
10
11
12
13
14
15
16
17
18
19
20
21import CoreData
/*
Similar to @dynamic in Objective-C, the @NSManaged attribute informs
the Swift compiler that the backing store and implementation of a property
will be provided at runtime instead of at compile time.
The normal pattern is for a property to be backed by an instance variable
in memory. A property on a managed object is different: It’s backed by the
managed object context, so the source of the data is not known at compile time.
*/
class Bowtie: NSManagedObject {
// bool,double,int -> NSNumber
var isFavorite: NSNumber
var lastWorn: NSDate
var name: String
var rating: NSNumber
var searchKey: String
var timesWorn: NSNumber
var photoData: NSData // 二进制-> NSData
var tintColor: AnyObject // 可变类型-> AnyObject
}
如果不想使用NSNumber,更加紧准的类型映射需要在创建类时勾选Use scalar properties for primitive data types in the last dialog,虽然这里暂时不勾选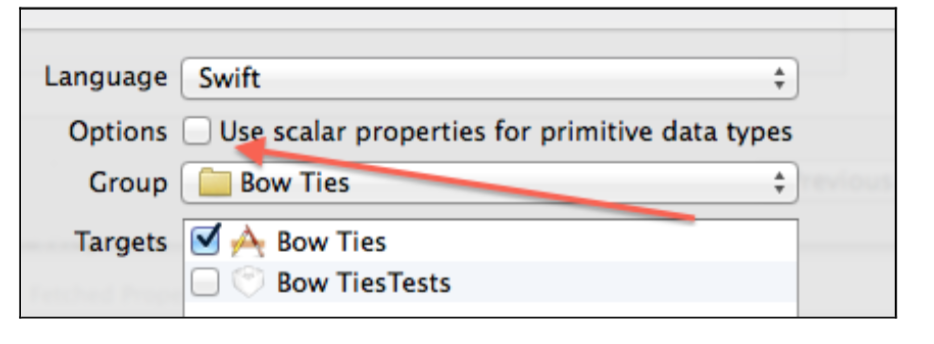
还有很重要的一点,你需要链接Bowtie到数据模型编辑器的Bowtie实体。(脑补StoryBoard 与 view的链接)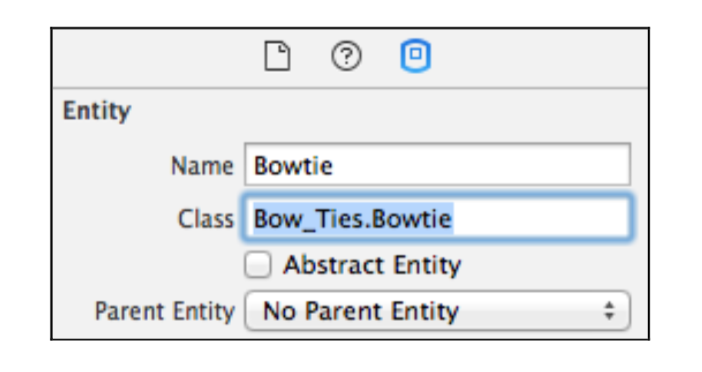
Next to Class, replace Bowtie with Bow_Ties.Bowtie. This is the fully specified class name for Bowtie.swift. This last step links the runtime Bowtie class to the Bowtie entity in the data model editor.
Congratulations, you’ve just made your first managed object subclass in Swift! Compared with key-value coding, this is a much better way of working with Core Data entities. There are two main benefits:
Managed object subclasses unleash the syntactic power of Swift properties. By accessing attributes using properties instead of key-value coding, you again befriend Xcode and the compiler.
You gain the ability to override existing methods or to add your own convenience methods. Note that there are some NSManagedObject methods you must never override. Check Apple’s documentation of NSManagedObject for a complete list.
Third ,propagating a managed context
传递上下文到控制器,毕竟老是用appdelegat是比较烦的,so pass the managed context from class to class via a property.
在控制器中,从plist中获取数据,and insert all the bow tie data you had in SampleData.plist into Core Data1
2// 从plist获取数据,然后插入到data
func insertSampleData()
想看看这两种特殊类型是怎么保存的,如下:1
2
3
4// image转变为NSData保存
let photoData = UIImagePNGRepresentation(image)
// 颜色直接用UIColor保存 - 一个专门由RGB返回颜色的方法
bowtie.tintColor = colorFromDict(tintColotDict)
这里涉及到一个类似SQL中WHERE语句的查找的类,NSPredicate,用法简单避免了你去学习火星的正则表达式,比如要在firstName中查找’Bob’:1
[NSPredicate predicateWithFormat:@"firstName = 'Bob'"];
当然这里仅仅只是查询满足“ searchKey ! = nil”(拥有searchKey)的数量,没有用到筛选功能:1
2
3
4 // 获取data中已存在数据的数量
let fetchRequset = NSFetchRequest(entityName: "Bowtie")
fetchRequset.predicate = NSPredicate(format: "searchKey ! = nil")
let count = managedContest.countForFetchRequest(fetchRequset, error: nil)
ok,保存搞定了,Now you need to access the data from somewhere!
所以开始获取初始数据吧!这一步我们要完成
This is where you fetch the Bowties from Core Data and populate the UI. 在ViewDidLoad中添加获取的代码:1
2
3
4
5
6
7
8
9
10
11
12
13
14// 2 从coreData获取数据
let request = NSFetchRequest(entityName: "Bowtie")
let firstTitle = segmentedControl.titleForSegmentAtIndex(0)
print("要查找seg的title[0]: \(firstTitle)")
// 3 根据segment的tilte配置请求,然后执行查找相应数据
request.predicate = NSPredicate(format: "searchKey == %@", firstTitle!)
var error: NSError? = nil
var results = managedContest.executeFetchRequest(request, error: &error) as! [Bowtie]?
// 4 根据获取结果的[Bowtie]集合,展示UI & 错误处理
if let bowties = results {
populate(bowties[0])
}else {
print("未能获取\(error),\(error!.userInfo)")
}
populate方法就是将按照searchKey获取到的数据放入[Bowtie]集合后,负责展示到UI上,就是把该显示的UI的数据装进去,大部分没有技术含量,只挑选以下几点,需要注意的是数据的格式需要转化,如NSNumber到Bool:1
2
3
4
5
6// 图片 - 由二进制提供
imageView.image = UIImage(data: bowtie.photoData)
// 颜色依旧是颜色
view.tintColor = bowtie.tintColor as! UIColor
// NSNumber -> bool
favoriteLabel.hidden = !bowtie.isFavorite.boolValue
然后运行,看到这样: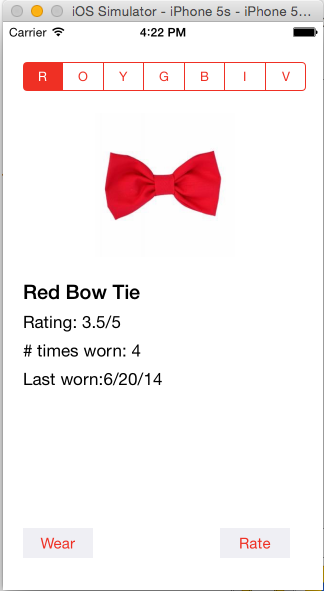
现在充分证明我们对CoreData数据的存,取,查都是成功的,下面来完善其他功能,为了能给当前显示的领结进行评分等操作,我们需要一个属性用以纪录当前领结,so:1
2// 当前显示领结
var currentBowtie: Bowtie!
然后就是实现和添加wear和rate功能了,完成之后发现一个问题,就是rate我们想规定中0-5,但是直接跑到了6,通常都是考虑在代码中输入时去提示限定,但有个更简单的办法,就是利用Xcode对rate做些限定处理: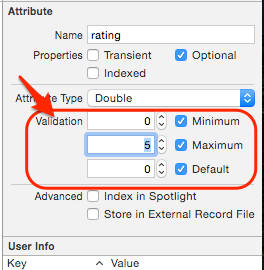
需要额外说明的是,绝对不要轻易version 模型设置,特别是在你已经发布版本之后,因为更新时很可能会带来严重的问题,但Attribute validation is one of the few exceptions.更多相关讨论先往后放。
当再次输入不再范围的数据时,就会有错误提升:
Optional(“R”)currentBowtie更新rate后,未能保存Optional(Error Domain=NSCocoaErrorDomain Code=1610
“The operation couldn’t be completed. (Cocoa error 1610.)”
根据错误对应的处理也是必须的:1
2
3
4
5
6
7
8
9
10
11
12
13
14
15
16
17var error: NSError?
if !managedContest.save(&error) {
/*
如果输入的评分过大或过小,评分无效
*/
print("currentBowtie更新rate后,未能保存\(error),\(error!.userInfo)")
if error!.code == NSValidationDateTooLateError || error!.code == NSValidationDateTooSoonError {
rate(currentBowtie)
}
}else {
populate(currentBowtie)
}
这样如果输入的评分不符合预期,过大或者过小评分无效就是了
还剩下一点儿根据不同segumentTitle匹配不同数据的功能就不再赘述了,留一点儿练手的机会自己慢慢玩儿吧…