CoreData and Swift by YongSir🇨🇳🇨🇳
上一篇中,已经体验了CoreData的基本使用,可以通过Xcode设计数据模型,可以对数据查询,增加,更改,但还不知道它的真正工作机制,而这将是这一篇的主要内容
Core Data Stack,the stack is made up of four Core Data Classes:1
2
3
4* NSManagedObjectModel - 托管对象模型
* NSPersistentStore - 持久化存储
* NSPersistentStoreCoordinator - 持久化存储协调器
* NSManagedObjectContext - 托管对象上下文
我们已经和上下文NSManagedObjectContext打过交道了,可想而知其他3个是相对底层的依赖在支援者上下文,所以还是老规矩借助一个Demo开始吧。
what we do later
Rather than rely on the default starter template, you’ll build your own Core Data stack: a customizable “wrapper” around these classes that works as a unit.
一个名叫”dog-walk”的小Demo,它可以保存你遛狗的时间日期并展示到tableView。不同的是,我们不再依赖Xcode的自动模版。
不过再次之前,先要隆重寄出这4个关键类
the mamaged object model
NSManagedObjectModel represents each object type in your app’s data model, the properties they can have, and the relationship between them. Other parts of the Core Data stack use the model to create objects, store properties and save data.
NSManagedObjectModel表征应用的数据模型中每个对象的类型,以及对象包含的属性和各对象的关联关系,CoreData的其他部分使用model创建对象,保存属性和数据。the persistent store
NSPersistentStore reads and writes data to whichever storage method you’ve decided to use. Core Data provides four types of NSPersistentStore out of the box: three atomic and one non-atomic.
NSPersistentStore读写数据的方式,coreData提供了四种方式:
1
2
3
4NSQLiteStoreType (default + nonatomic,backed by SQLite)
NSXMLStoreType (readable + atomic, blacked by XML File, but have a large memory footprint, so available on OS X)
NSBinaryStoreType (just like XML, large memory cost + atomic,blacked by a binary data file)
NSInMemoryStoreType (in-memory not really persistent, terminate disappears)the persistent store coordinator
NSPersistentStoreCoordinator is the bridge between the managed object model and the persistent store. It is responsible for using the model and the persistent stores to do most of the hard work in Core Data. It understands the NSManagedObjectModel and knows how to send information to, and fetch information from, the NSPersistentStore.
NSPersistentStoreCoordinator also hides the implementation details of how your persistent store or stores are configured. This is useful for two reasons:NSManagedObjectContext (coming next!) doesn’t have to know if it’s saving to an SQLite database, XML file or even iCloud.
If you have multiple persistent stores, the persistent store coordinator presents a unified interface to the managed context. As far as the managed context is concerned, it always interacts with a single, aggregate persistent store.NSPersistentStoreCoordinator负责桥接托管对象模型和持久化储存,负责model的使用和固化存储等艰难的工作,推断出“向NSPersistentStore发送信息”或者“从NSPersistentStore获取信息”等行为。NSPersistentStoreCoordinator还隐藏了怎样持久化存储的配置的具体实施细则。这样一来上下文不需要关心数据固化的类型,不论是SQLite,XML或者其他类型
如果是多种类型混合使用,协调器就为上下文提供一个便于管理的统一接口the managed object context
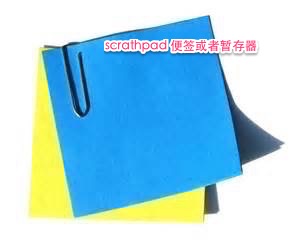
NSManagedObjectContextis an in-memory ‘scratchpad’, do all works within it, and any changes won’t affect the underlying data on disk until you call save() on the context.
上下文是一个内存中的暂存器,所有的工作都要用到它,任何变动在save()到上下文之前是不会影响到硬盘上的数据的。它是如此的重要请务必注意所以下特性:The context manages the lifecycle of the objects that it creates or fetches. This lifecycle management includes powerful features such as faulting, inverse relationship handling and validation.
上下文管理着对象创建和获取的整个生命周期 -包含一些强大的特性如错误,逆向关系以及验证。A managed object cannot exist without an associated context. In fact, a managed object and its context are so tightly coupled that every managed object keeps a reference to its context, which can be accessed like so:
1
let employeeContext = employee.managedObjectContext
托管对象不能独立于其上下文而单独存在,他们是如此紧密的耦合,以致于我们约定以这样的命名和代码来获取它。
Contexts are very territorial; once a managed object has associated with a particular context, it will remain associated with the same context for the duration of its lifecycle.
上下文是非常自卫的(领土的,真不好翻译😓),一旦托管对象指定了一个上下文,那么在这个对象的整个生命周期都将和先前指定的上下文捆绑关联。An application can use more than one context—most non-trivial Core Data applications fall into this category. Since a context is an in-memory scratch pad for what’s on disk, you can actually load the same Core Data object onto two different contexts simultaneously.
一个应用程序可以拥有不止一个上下文,许多优秀的应用都使用这一特性。因为它仅仅只是磁盘上内容在内存中的一个暂存,所以你大可以同时通过不同的上下文加载同一份CoreData对象。A context is not thread safe. The same goes for a managed object—you can only interact with contexts and managed objects on the same thread in which they were created. Apple has provided many ways to work with contexts in multithreaded applications. You’ll read all about different concurrency models in Chapter 10, “Multiple Managed Object Contexts.”
上下文不是线程安全的,同样托管对象也不是,所以你正能在创建它们的同一线程中与他们交互。Apple也提供了很多种上下文在不同线程工作的机制,后面会介绍到。
总之NSManagedObjectContext是一个强大,牛气,专业,忠诚而又脆弱的一片内存暂存。
Now it’s time to return to Dog Walk and implement your own Core Data stack.
首先,建立模型和lazy Core Data Stack
3个主要的步骤 + 设置磁盘固化配置NSPersistentStore:
关联 .momd(也就是.xcdatamodeld)文件的NSManagedObjectModel
创建一个托管对象的协调器NSPersistentStoreCoordinator
创建上下文NSManagedObjectContext
1 |
|
这是一种方法,当然最推荐的还是官方文档中的方法,对比可明显看出官方版本要严谨很多,甚至可以直接套用。
然后:
- 在AppDelegate中lazy coreData,然后获取上下文传递到VC中以便于使用。
- Xcode创建“.xcdatamodeld”,注意文件命名要和代码中一致。
添加entity:Dog 和 Walk,设置属性和依赖关系,It’s OK to leave this relationship as a to-one relationship. A dog can have many walks, but a walk can only belong to one dog—for the purposes of this app, at least. :]
另外可以到graph editor中去看看,like this: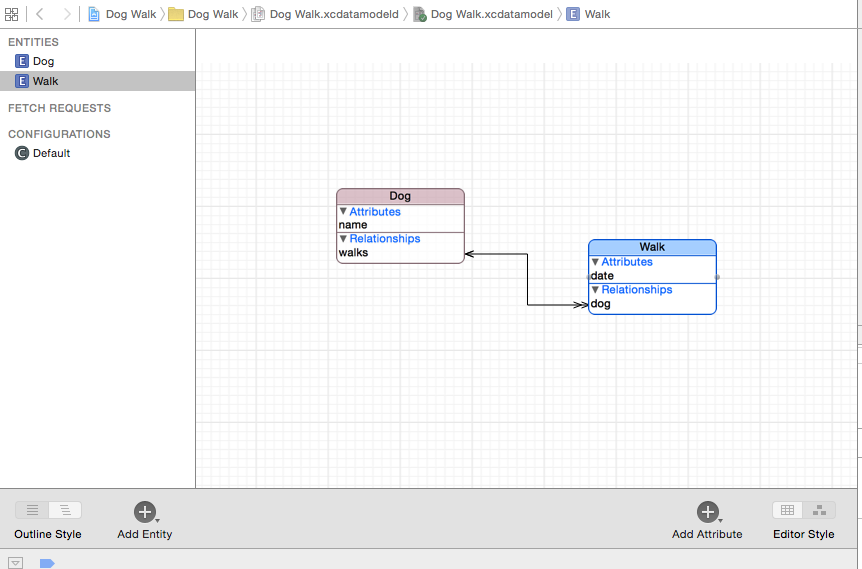
其次,添加模型对象子类
还是借助Xocde在保证打开cordite editor的基础上,选择creat NSManagedOject SubClass…2个都选,发现生成4个文件,Dog 和 Dog+CoreDataProperties 和 Walk也一样(Xcode7 + swift2.0),如果是原来的话,还有很重要的一步,要将类名关联,将类名关联,将类名关联!
但是那样会出现错误,因为Xcode7会自动关联,还有添加@objc( XXX )什么的也不必了
然后,我们就开始愉快的使用啦
基础功能:首先是在 viewDidLoad() 中InsertDog实体,思路就是“ 首先获取所有叫“Fido”的实体,如果得到空数组[],表示这是第一次使用App
首次使用,需要用户添的dog命名为“Fido””,然后替换声明currentDog属性,
在添加BTN按下之后,为currentDog添加Walk,然后reloadData:1
2
3
4
5
6
7
8
9
10
11
12
13
14
15
16
17
18
19
20
21
22
23
24/* 增加溜狗 */
func add(sender: AnyObject) {
// 添加Walk到CoreData
let walkEntity = NSEntityDescription.entityForName("Walk", inManagedObjectContext: managedContext)
let walk = Walk(entity: walkEntity!, insertIntoManagedObjectContext: managedContext)
walk.date = NSDate()
// 添加walk到Dog的walk集合
let walks = currentDog.walks?.mutableCopy() as! NSMutableOrderedSet
walks.addObject(walk)
currentDog.walks = walks.copy() as? NSOrderedSet
// 保存上下文
do {
try managedContext.save()
print("ok")
} catch let error as NSError {
print("添加walk失败\(error)")
}
// 刷新UI
tableView.reloadData()
}这样就基本完成了App的功能。这就是CoreData关联对象带来的便利之处,并没有写复杂的字典转模型之类的,而是借助系统完成
删除数据。截止到目前,我们已经可以完成“增 查 改”的功能,而删除功能自然是没有理由缺失的,所以看看coreData的删操作
1
2
3
4
5
6
7
8
9
10
11
12
13
14
15
16
17
18
19
20
21
22
23func tableView(tableView: UITableView, canEditRowAtIndexPath indexPath: NSIndexPath) -> Bool {
return true
}
func tableView(tableView: UITableView, commitEditingStyle editingStyle: UITableViewCellEditingStyle, forRowAtIndexPath indexPath: NSIndexPath) {
if editingStyle == UITableViewCellEditingStyle.Delete {
// 待删除walk
let walkToRemove = currentDog.walks![indexPath.row] as! Walk // 从上下文删除
managedContext.deleteObject(walkToRemove)
// 保存上下文
do {
try managedContext.save()
print("ok")
} catch let error as NSError {
print("添加walk失败\(error)")
}
// 刷新UI
tableView.deleteRowsAtIndexPaths([indexPath], withRowAnimation: UITableViewRowAnimation.Automatic)
}借用tableView的左划出delete,然后commit时完成删除操作,核心方法在于
managedContext.deleteObject(walkToRemove)对上下文的操作至此 coreData的增删查改都已经有了,不管是利用Xcode还是手动创建stack都搞定了,如果只是简单的使用可以到此就告一段落了