CoreData and Swift by YongSir🇨🇳🇨🇳
实际使用中,使用tableView来展示数据是如此的普遍,以至于官方针对列表中的方便的展现做了封装,这就是我们这一篇的主要目的--NSFetchedResultsController。
In fact, they saw so much potential for a close connection between UITableView and Core Data that they penned a class to formalize this bond: NSFetchedResultsController.
As the name suggests, NSFetchedResultsController is a controller, but it is not a view controller. It has no user interface. Its purpose is to make developers’ lives easier by abstracting away much of the code needed to synchronize a table view with a data source backed by Core Data.
Set up an NSFetchedResultsController correctly, and your table will “magically” mimic its data source without you have to write more than a few lines of code.
(就像 NSFetchedResultsController 的名称,它是一个控制器但不是view的控制器,只是便于数据和tableView关联的抽象的封装代码,让你短短几行代码,就能“魔法般的”让coreData数据源化)
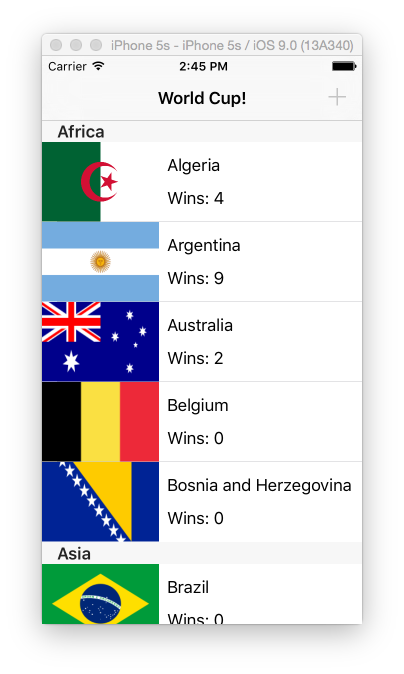
我们借用一个WorldCup 的Demo来演练:Demo模拟球队的积分,tap一次代表加一分,得分最高的就是winner。
首先是,创建和设置NSFetchedResultsController,使用唯一的一个初始化方法:
1 | // MARK:设置fetchedResultsController |
特别要注意的是,FetchedResultsController是依赖于普通的NSFetchRequest的,并且这个request至少需要指定一种sort,否则就会报一个错误:
1 | 'NSInvalidArgumentException', reason: 'An instance of NSFetchedResultsController requires a fetch request with sort descriptors' |
事实上,fetchResultsController还将fetch到的结果封装在了fetchObjects属性和objectAtIndexPath中,在dataSource下是:1
return fetchedResultsController.sections!.count
然后获取模型数据,装填到cell是这样的:1
2
3
4
5
6
7
8func configureCell(cell: TeamCell, indexPath: NSIndexPath) {
// - 通过fetchCtoller获取数据
let team = fetchedResultsController.objectAtIndexPath(indexPath) as! Team
// - cell设置
cell.flagImageView.image = UIImage(named: team.imageName)
cell.teamLabel.text = team.teamName
cell.scoreLabel.text = "Wins: \(team.wins)"
}
补充完成“tap加1”的功能:1
2
3
4
5
6
7
8
9
10
11
12// MARK: -- tableView delegat --
func tableView(tableView: UITableView,
didSelectRowAtIndexPath indexPath: NSIndexPath) {
let team = fetchedResultsController.objectAtIndexPath(indexPath) as! Team
// tap加1 操作
let wins = team.wins.integerValue
team.wins = NSNumber(integer: wins + 1) // 类型转换
// 保存
coreDataStack.saveContext()
// 刷新UI
tableView.reloadData()
}
至此基本的功能就完成了,从数据展示到数据更改,倒是并没见得有什么magic的地方, 😓,接下来就是放大招的时候
将各个队伍小组化
There are six qualifying zones in the World Cup: Africa, Asia, Oceania, Europe, South America and North/Central America. The Team entity has a string attribute named qualifyingZone that stores this information.
任务是就将各个国家放到其对应的预选赛区的section中,如果是通常情况下,这看起来是个需要首先整理model然后再改写数据源方法的繁琐步骤,但是借助fetchedResultsController就会容易很多,仅仅只需要更改2个小地方即可:
更改fetchResultsController的实例化funcsetFetchController() 中:
1
2
3// 2 fetch控制器的实例话仍然依赖于 NSFetchRequest 和 context上下文
// 更改使用keyPath“qualifyingZone”做实例化
fetchedResultsController = NSFetchedResultsController(fetchRequest: fetchRequset, managedObjectContext: coreDataStack.context, sectionNameKeyPath: "qualifyingZone", cacheName: nil)实现dataSourece的方法,为section设置title:
1
2
3
4
5// 设置title
func tableView(tableView: UITableView, titleForHeaderInSection section: Int) -> String? {
let sectionInfo = fetchedResultsController.sections![section]
return sectionInfo.name
}
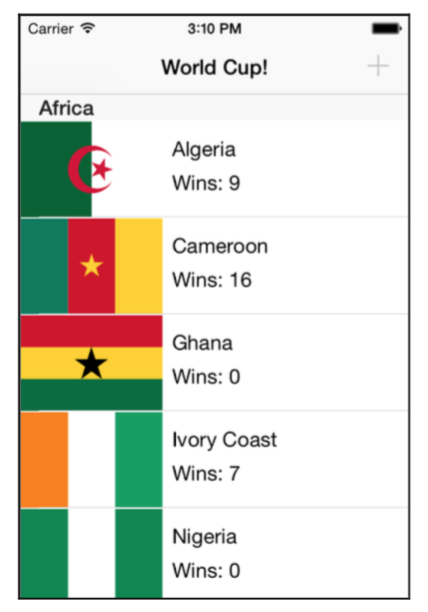
运行得到效果:
视觉上差不多实现了,但是等等,阿根廷为什么成了非洲的队伍了,数据错乱了,是cell重用的的问题还是本身数据的问题?
这里应该数据的问题,因为排序指定的仍然还是按照A~Z的顺序排列,而添加国籍之后按国籍group排列会与之冲突,所以这就引出了并列排序中的著名的“疑难杂症”--排序规则冲突:The problem was the sort descriptor. This is another NSFetchedResultsController “gotcha” to keep in mind. If you want to separate fetched results using a section keyPath,the first sort descriptor’s attribute must match the key path’s attribute.
The documentation for NSFetchedResultsController makes this point emphatically, and with good reason! You saw what happened when the sort descriptor doesn’t match the key path—your data ends up making no sense.
所以更改如下
1
2
3
4
5// 更改排序 - 注意排序不要冲突,否则会乱掉
let zoneSort = NSSortDescriptor(key: "qualifyingZone", ascending: true)
let scoreSort = NSSortDescriptor(key: "wins", ascending: true)
let nameSort = NSSortDescriptor(key: "teamName", ascending: true)
fetchRequset.sortDescriptors = [zoneSort, scoreSort, nameSort]这样对结构就按照,先
地域,再积分,最后队名的排列顺序了
在NSFetchedResultsController的协助之下,我们不必遍历所有队伍,按区域分别对应找到各个国家组成小组,然后再在小组内排序,而是很简单的代码就能实现这些功能,too maigical!cache的引入
首先考虑这样一种场景,如果这里不是32个国家,而是让你玩成我朝13亿人的人口分类,按照不同的省市地区归类的话,这样就势必带来一个性能和内存的问题。我可以自作聪明的开一个线程,like this“I’d just throw that on a background thread!” might be your first thought. The table view, however, can’t populate itself until all sections are available. You might save yourself from blocking the main thread, but you’d still be left looking at a spinner.
There’s no denying that this operation is expensive. At a bare minimum, you should only pay the cost once: figure out the section grouping a single time, and reuse your result every time after that.
除了放到后台线程之外,对于类似这样的’昂贵’操作,最好的和最必要方式就是:
既然无法避免,那就尽量只做一次!这就是“Cache”的真正意义。好在苹果已经为我们考虑到了,在fetchedResultsController的实例话中,那4个参数的做后一个就是cacheName1
2// 再次更改,指定cache的name
fetchedResultsController = NSFetchedResultsController(fetchRequest: fetchRequset, managedObjectContext: coreDataStack.context, sectionNameKeyPath: "qualifyingZone", cacheName: "worldCup")需要注意的是,cacheName是非常sensitive的,他标示这样一种“单例”般的机制,如果没有即表示首次加载,就加载,如果已经存在即非首次加载,就会根据这个标记取cache中去取第一次的结果,保证只加载一次。所以就可以理解cacheName的sensitive了,如果变动了使用,就用deleteCacheName或者重新指定新的name来变更。
监测变动
截止目前可见,使用NSFetchedResultesController至少带来两个好处:方便处理section和做cache处理。下面介绍第三个好处,但要说明的是,虽然功能强大但也很容易出错,就是鼬神的“越是强大的术就越有不可克服的缺陷和风险”。
The third and last benefit is somewhat of a double-edged sword: it is powerful but also easy to misuse.
先回忆在“Tap 加 1”的功能是,Tap一下wins+1,然后tableView.reloadData,这种方式粗暴有效,但如果考虑的更多比如Demo的下一个版本,如果并不是通过这种“tap+1”获得积分,而是从网络获取win积分,就应该考虑一种更加接近基础数据的方式,做到只要数据有变化就能及时的展示。
Maybe there’s a detail screen for every team where you can change the score. Maybe the app calls an API endpoint and gets new score information from the web service. It would be your job to refresh the table view for every code path that updates the underlying data.
这就需要NSFetchedResultsController的代理来帮忙了,它可以监听基础数据的变化过程,让你轻松做到只要基础数据变化就自动刷新列表显示:
NSFetchedResultsController can listen for changes in its result set and notify its delegate, NSFetchedResultsControllerDelegate. You can use this delegate to refresh the table view as needed any time the underlying data changes.
Note: A fetched results controller
can only monitor changes made via the managed object context specified in its initializer. If you create a separate NSManagedObjectContext somewhere else in your app and start making changes there, your delegate method won’t run until those changes have been saved and merged with the fetched results controller’s context.操作上需要遵守协议
NSFetchedResultsControllerDelegate,设置代理1
2// 设置代理
fetchedResultsController.delegate = self实现方法:
1
2
3
4
5// MARK: -- NSFetchedResultsControllerDelegate
func controllerDidChangeContent(controller: NSFetchedResultsController) {
// 再次更新UI
tableView.reloadData()
}虽然改动并不大,但这样就意味着,基础数据只要有任何改动,不管是通过tap还是从网络获取从而改动,都会刷新列表数据。但仅仅是这样还是不够,虽然我并没能重复错误,倒是跳跃感很影响体验:
The score labels update as before, but this reveals another problem. If you tap around enough times, you might get into a state where teams within a qualifying zone are not ranked by number of wins. For example, in the previous screenshot, you can see Cameroon below Algeria. However, Cameroon has 16 wins and Algeria 9. Also, when the cells do move around, it’s pretty jumpy, almost as if you were completely reloading the table every time something changed. :]
显然我们还需要调整,为了不显得那么跳跃,需要再到代理中:
The fetched results controller delegate can tell you if something needs to be moved, inserted or deleted due to a change in the fetched results controller’s result set.
由于改动都是在controller的结果集合中,所以借助代理可以让你决定是否去添加,删除或者移动。换言之,能够让开发者控制到底该“如何显示,显示谁”,在这里,我们要改动代理方法中的实现:
1
2
3
4
5
6
7
8
9
10
11
12
13
14
15
16
17
18
19
20
21
22
23
24
25
26
27
28
29
30
31
32
33
34
35
36
37
38
39
40
41
// MARK: -- NSFetchedResultsControllerDelegate
// 按照“begin updates-make changes-end updates”的顺序变更
func controllerWillChangeContent(controller: NSFetchedResultsController) {
// 开始更新
tableView.beginUpdates()
}
func controller(controller: NSFetchedResultsController, didChangeObject anObject: AnyObject, atIndexPath indexPath: NSIndexPath?, forChangeType type: NSFetchedResultsChangeType, newIndexPath: NSIndexPath?) {
print("move \(indexPath!) -> \(newIndexPath!)")
/*
根据数据的不同type,进行区分操作
- Insert
- Delete
- Update
- Move
*/
switch type {
case NSFetchedResultsChangeType.Insert:
tableView.insertRowsAtIndexPaths([newIndexPath!], withRowAnimation: UITableViewRowAnimation.Automatic)
case NSFetchedResultsChangeType.Delete:
tableView.deleteRowsAtIndexPaths([indexPath!], withRowAnimation: UITableViewRowAnimation.Automatic)
case NSFetchedResultsChangeType.Update:
tableView.cellForRowAtIndexPath(indexPath!) as! TeamCell
case NSFetchedResultsChangeType.Move:
tableView.deleteRowsAtIndexPaths([indexPath!], withRowAnimation: UITableViewRowAnimation.Automatic)
// tableView.insertRowsAtIndexPaths([indexPath!], withRowAnimation: UITableViewRowAnimation.Automatic)
tableView.insertRowsAtIndexPaths([newIndexPath!], withRowAnimation: UITableViewRowAnimation.Automatic)
default :
break
}
}
func controllerDidChangeContent(controller: NSFetchedResultsController) {
// 结束更新
tableView.endUpdates()
}
Note that the order and nature of the methods ties in very neatly to the “begin updates-make changes-end updates” pattern used to update table views. This is not a coincidence! 这是按照官方文档指导的按照“开始-更新-结束”的顺序。注意insert时由于不存在指定index所以要newIndexPath的
controllerWillChangeContent->didChangeObject, atIndexPath, forChangeType type->controllerDidChangeContentThis delegate method is similar to didChangeObject… but notifies you of changes to sections rather than to individual objects.还有一个代理方法。类似于didChangeObject方法,只是关注的是section的改变,比如现在有一只全新的队伍在一个全新的分组(或许是火星队😛)之下,这个代理就有用了
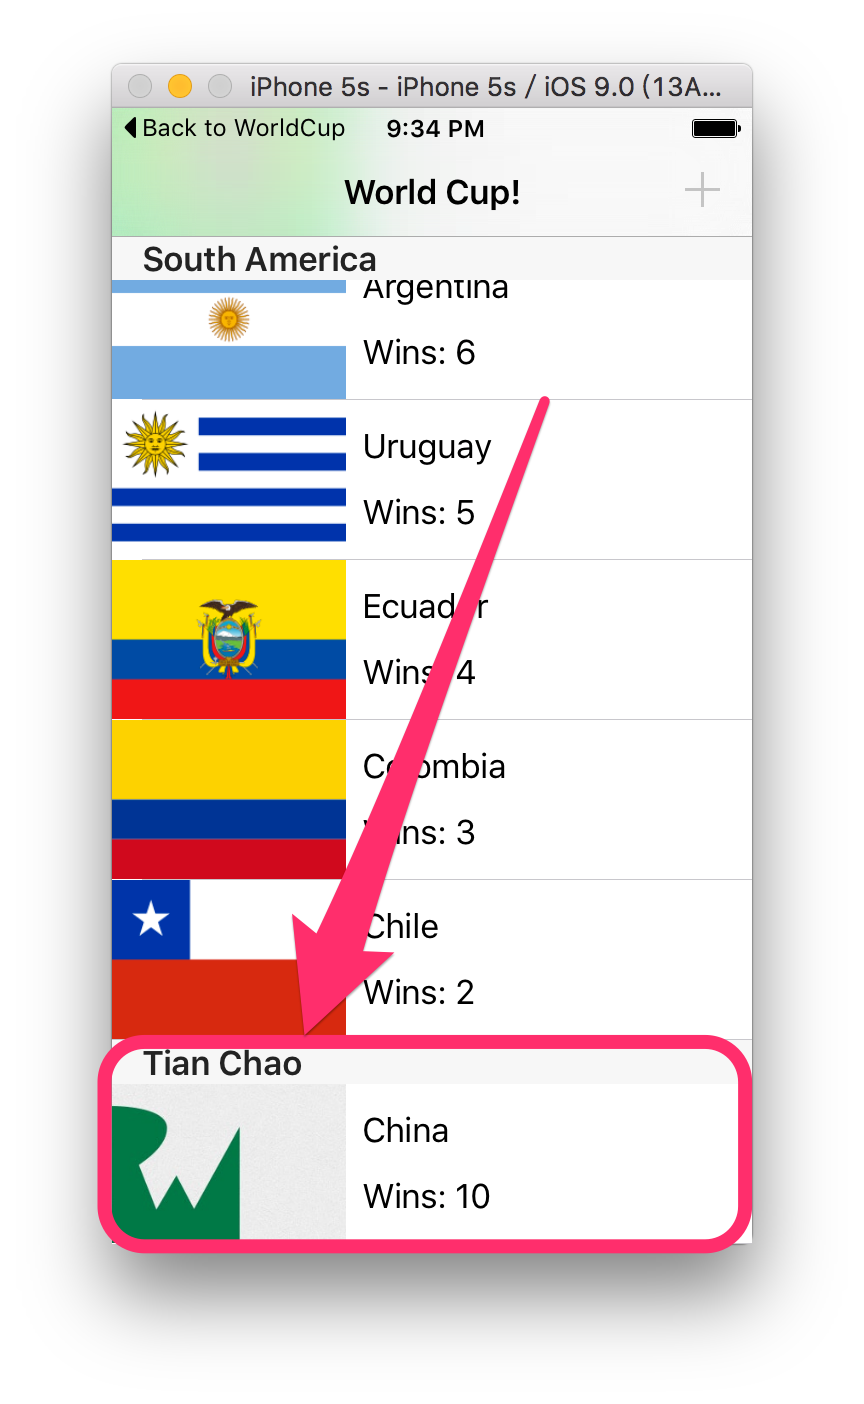
如果注意细节的话,在Demo中还有一个默认不启用的addItem,显然这是为我大国足准备的,因为要是等国足堂堂正正的踢进世界杯,就想殖民火星一样现实,所以我们傲娇的设置了一个后门,用来将我大国足保送到世界杯,使用摇一摇即可激活
1
2
3
4
5
6// MARK: 震动激活添加按钮 -> 中国队冲击世界杯专用
override func motionEnded(motion: UIEventSubtype, withEvent event: UIEvent?) {
if motion == UIEventSubtype.MotionShake {
addButton.enabled = true
}
}然后添加方法:
1
2
3
4
5
6
7
8
9
10
11
12
13
14
15
16
17
18
19
20
21
22
23
24
25
26
27
28
29
30
31
32(iOS 8.0, *)
// 国足走后门专用方法
func addTeam(sender: AnyObject) {
let alert = UIAlertController(title: "天朝特色", message: "目前看来中国足球进世界杯只能用这种手段了", preferredStyle: UIAlertControllerStyle.Alert)
alert.addTextFieldWithConfigurationHandler { (textField) -> Void in
textField.placeholder = "Team name"
}
alert.addTextFieldWithConfigurationHandler { (textField) -> Void in
textField.placeholder = "Qualifying Zone"
}
alert.addAction(UIAlertAction(title: "Save", style: UIAlertActionStyle.Default, handler: { (action) -> Void in
print("--开始保送国足--")
// 1
let nameTextFeild = alert.textFields![0]
let zoneTextFeild = alert.textFields![1]
// 2 新插入一个实体--当然就是万年进不了的国足了
let team = NSEntityDescription.insertNewObjectForEntityForName("Team", inManagedObjectContext: self.coreDataStack.context) as! Team
team.teamName = nameTextFeild.text!
team.qualifyingZone = zoneTextFeild.text!
team.imageName = "wenderland-flag"
// 3
self.coreDataStack.saveContext()
}))
alert.addAction(UIAlertAction(title: "cancel", style: UIAlertActionStyle.Cancel, handler: { (action) -> Void in
print("被cancel,果然上帝都要放弃国足了🙀")
}))
presentViewController(alert, animated: true, completion: nil)
}代码比较简单不在赘述,总之为国足提供了一个社会主义优越性的后门,并单独开一个区就能保证晋级了
感谢强大的代理,让我们可以做到只要原始数据更改,就自动触发刷新数据,而不管原始数据是怎样变化的
…国足…🙏